
The Imaging Team have recently started work on a research project titled, ‘“Werck der Bücher”: Transitions, Experimentation, and Collaboration in Reprographic Technologies, 1440–1470’, part of which involves the imaging of paper watermarks and paper structure.
Standard imaging or photography of watermarks is usually undertaken with transmitted light. That is, light shining through the paper to help reveal the paper characteristics, such as a watermark, laid and chain lines. This method of imaging is usually deemed adequate for the most basic analysis.
Historically, paper watermarks were best imaged using Beta Radiographs, which can produce high quality and high contrast images of the paper characteristics. Beta Radiographs are useful as they do not show any of the ink or pigment used on the paper.
Some examples can be seen here showing the paper structure without any text.

Beta Radiographs remain expensive, they can require long exposures, sometimes many hours, and the use of Carbon 14 radioactive material. So not an easily accessible method of imaging.
A far simpler method employed by researchers, but frowned upon by many a curator and conservator, is that of rubbings or tracings of the watermark.

When it comes to standard photographic methods, whether digital or analogue, transmitted light capture is the first method many will approach. An additional digital method has been to digitally select the ink or pigments and “fill” with a mid tone similar to the paper colour. This can reduce the distraction of the ink or “visual noise” when looking at the watermark and paper structure as in the example here of Catholicon, 3383.

At the John Rylands Research Institute and Library we are able to utilise our multispectral imaging system to further enhance watermark imaging as demonstrated in the images below of Biblia Pauperum, R4588. First we have a reflected light image of 535nm (Green), then a reflected light image of 850nm (near infra-red) and then a transmitted light image with 850nm (near infra-red). We can clearly see, in the larger image, that certain inks will respond well to this type of imaging. In this case, iron gall ink with infra-red transmitted light allows us to examine the watermark without the “visual noise” of the ink. Unfortunately, many of our early printed books have carbon-based inks, which are problematic with this type of imaging. MSI can also prove to be time-consuming, data- and processing heavy, and our specific MSI-transmitted light panel can be difficult to introduce into fragile bound items.


We appreciate that not everyone has access to a multispectral imaging system, so we began to look at other imaging methods that would be more accessible, not only to our own researchers but also to others in the wider community.
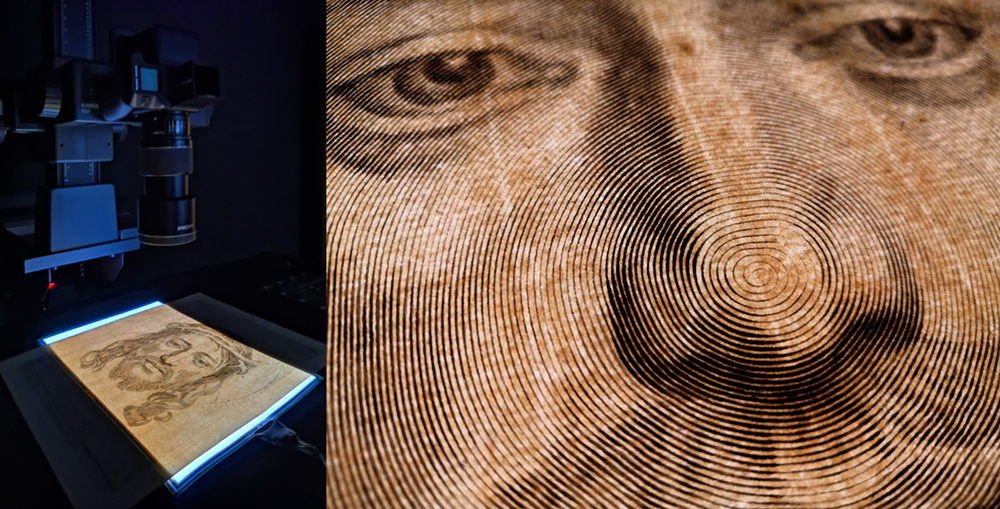
Image capture of watermark material can be straightforward. The item is placed beneath a camera on a copy stand with a light panel or sheet beneath the page. Firstly, we capture a reflected light image with our studio LED panels. We then turn these off, illuminate the flexible light panel, and capture the transmitted light image. In this way the image pixel area remains aligned and registered with each other when we compare the two images together. This is important for when the data is processed later.
We began to look at processing standard images, reflected and transmitted, with software that we would normally use with our MSI data, in this case ImageJ/Fiji an open-source image processing package.
Our initial test example was a 16th-century metal cut print of the Crucifixion, 23025. When viewed with transmitted light the watermark is very difficult to see, so a worthy challenge.

In the first instance we broke the two images down into six wavelengths by splitting them into two sets of RGB – Red, Green, and Blue – channels. These were then run through our usual MSI workflows with some success, but not everyone will be willing to learn a new software and may find ImageJ/Fiji a little daunting.
It was the use of an ImageJ plugin called DStretch that proved the most useful. DStretch was developed by Jon Harman in the US for bringing out details in faint rock art pictographs and cave drawings. It uses Decorrelation Stretch, an image enhancement algorithm, first used for aerial photography. By cycling through the range of settings, the watermark can be revealed.

From this, we began to look at how these results could be replicated in other software that our research team may have access to and may be more familiar with, such as Adobe Photoshop.
The aligned reflected and transmitted light images are imported in Adobe Photoshop as Layers. We can then use the Layer Blending modes to help to reveal the watermark. Depending on the paper structure, density, weight, condition, and inks used a variety of Layer Blending modes will prove useful. The most straightforward example will be where there is ink on only the one side of the paper. When there is ink on both sides, paper repairs, or supporting papers further actions may be required such as Inverting layers, Levels Adjustments and Channel Mixing. Any number of actions may improve your results. One action that proves successful may not prove successful on the next page.

Here’s a screengrab sequence of this method with the Blockbook Speculum Humanae Salvationis, 17684.

Here’s an example where the original paper material has been laid and mounted onto another sheet of paper for binding, this also has its own paper characteristics, which can now be more easily seen using this imaging method.

The same imaging method has proven useful, not just for watermark imaging, but for visualising the layers of pastedown material. Here an armorial book plate for Richard Towneley, pasted onto the reverse of a Proclamation from 1517 (23027) but sandwiched between another sheet of support paper, so not visible under normal lighting conditions.

Of course, we are not the only imaging team looking at this particular research question. The National Archives produced a very interesting blog post in 2020, imaging watermarks with great results, but this is still using their own MSI system. It is not known what processing algorithms are used here and it is a bit of a black box system – Phase Shift imaging is mentioned but there is no detailed description for what that entails.
There is also the LeoCode project, which at the same time as we have been developing our own workflow, was developing their own. In July 2023 they published the article The Watermark Imaging System: Revealing the Internal Structure of Historical Papers. This was published just as we had submitted a conference paper with our own findings. One of our Lead Researchers, Stephen Mossman, describes this as an instance of convergent evolution. As part of that research, they have developed a simple visualisation tool for removing surface pigments. This seems to be a very similar workflow to our own Adobe Photoshop methods.
Out of further curiosity we began to think that we could not be the only people to have thought of this methodology: surely someone had used it before, as it is such a simple process. However, there does seem to be a lack of research examples.
In a text called “Scientific Aids for the study of Manuscripts” by Reginald Haselden, published in 1935, we found this example of photographing palimpsest pages.

The first image with ordinary light showing the main body of text, the second with UV light showing the over and under texts mixed together, and then a composite of the two superimposed, one as a positive and one as a negative. Thus revealing the two separate texts and making them far more defined to the reader. Remember this is an analogue method and not digital. So exactly the same method we had been using digitally in Adobe Photoshop for revealing watermarks.
The next obvious step would be to look at the rapid development of Artificial Intelligence (AI) tools that are becoming commonplace. Adobe Photoshop already has in-built AI capabilities. If you scroll back up through this blog post to the third image, where we have selected the ink in Photoshop and “filled” with a mid-tone of the paper. We can now use “Content Aware Fill” to replace the ink. Here’s a selective reveal of a watermarked page in Block book Speculum Humanae Salvationis, 17256.

This relatively simple imaging method will assist our research team in identifying paper watermarks. For the pages where this method proves less successful, which we estimate to be 15-20%, then we may progress to other imaging methods including Multispectral Imaging and Reflectance Transformation Imaging (RTI).
This aligned reflected and transmitted light image processing may prove useful to others and we are sure that it can be adapted and improved. Please let us know if you try it and if it has been of use.
If you have any questions about any of the imaging methods we use then please do get in touch with the JRRI Imaging Team!
Great blog Tony!
Very interesting – I am also interested in the Overlaet drawing. Where is it and does it have an inventory number?
Hi Simon,
The Overlaet print has a reference of VFA.59
The Mellan original is VFA.58.57
Both at The John Rylands Research Institute and Library, University of Manchester.
The Overlaet is surely a drawing! He specialised in drawn copies of prints and he made many of the Mellan print in different formats.
Many thanks
Yes sorry, my error replying, a drawing of the print. As soon as I replied, I realised, glad you responded.
Very interesting and compelling reading continuing on from your excellent presentation at the AHFAP conference this year. Excellent detective work chasing down a non MSI way of getting very acceptable results.
HI. I use a light sheet and then sometimes edit the photos. But I am having particularly bad luck with removing black letter. Do you have any tips?
This is my image site: I have quite a large collection
https://www.flickr.com/photos/tallatango/ [flickr.com]. Erika
Hello Erika,
Some of the methods mentioned in the blog post might help, but the density of ink and pigments can be problematic.
If you have access to Photoshop, you could try selecting the text either with the magic wand tool or by Select colour range / shadows. And then use the Content Aware Fill. This may take a few attempts for the best settings.
For future images, try taking a reflected light image and then a transmitted light image without moving anything, camera or paper. Then, in Photoshop, try the Layer Blending options. It works well with some tweaking.
Or you can contact the Research Team behind LeoCode, who 7 written a script for an Opensource viewer you can download that works well with some watermarks.
If you have any further questions, you can contact me directly via the Imaging email.